
Our recent move has inspired a new wave of thrifting, restoring, and DIYing for our beautiful new townhouse. I would walk through Pottery Barn isles and dream of my house looking like a magazine. But what twenty-something has the budget for that?
After months of projects and research, I have compiled your one-stop shop for all things DIY home decor and furniture. Read the whole thing, read bits and pieces–whatever your reason for clicking on this article, you will find it here…somewhere.
Pre-DIY Need-to-Knows:
You’re gonna get dirty. Whether it’s hauling a beat-up piece of furniture to your car or getting covered in spray paint, this process isn’t always glamorous. Actually, it never is…until it is done.
Prep your project well. A lot of the projects I feature here are simply paint jobs. But if you don’t have the right sanders, brushes, paints, knobs, etc., the job doesn’t turn out right. Stay tuned for another article or message me for more about these specifics!
Know what you need. Buying excess pieces/projects when you don’t have a place for them is a waste of your time and money.
To find the kind of deals I found, you will have to take *multiple* trips to your local thrift store, Goodwill, yard sales, etc. You may think it isn’t worth the effort, but I’m about to show you why it is.


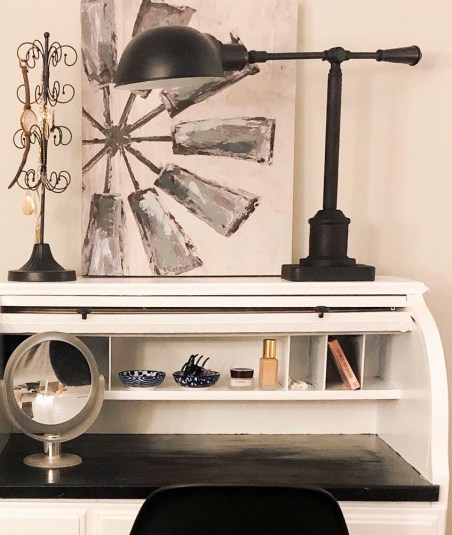
The Roll-Top Desk
Furniture Comp: $305.99 (and it doesn’t even have a solid base!)
Final DIY Cost (Furniture + Materials): $30
Savings: $275.99
I knew I needed a small desk to do my makeup and hair in the mornings. Last year, my “getting ready” space doubled as Mason’s work desk…that wasn’t ideal. On one of my *many* trips to Goodwill, I saw this adorable thing listed for $7! I knew the roll-top would work perfectly to hide all my hair/makeup clutter if I needed it to.
I bought the desk, took it home, cleaned it out (I even found a bone in one of the cubbies…let’s hope it wasn’t human), wiped and sanded, then proceeded with the painting.
I quickly realized I would need the primary desk surface *not* to be white…makeup stains that quickly. The black accent was the perfect solution. I spray painted the knobs, purchased a modern handle for the main drawer, and this desk has been a perfect addition to our bedroom ever since!


The Classic Dresser
Final DIY Cost (Furniture + Materials): $35
Savings: $344.99
When I found this dresser at Goodwill for $15, I knew it wouldn’t last long. There wasn’t anything wrong with it except it was missing one knob. Honestly, I could have left the dresser as-is and it would have been perfectly fine. But the weird paint wash and the blandness of the knobs inspired me to match it to my new roll-top desk.
After I prepped the piece, I painted it with the same white as the desk, spray painted the original knobs (they look new now!), and purchased a similar replacement knob for the one that was missing. When I put my new desk and dresser side-by-side, they are a perfect match!


Matching Side Tables
Furniture Comp: $111.99 X 2 = 223.98
Final DIY Cost (Furniture + Materials): $5
Savings: $218.98
What is a bedroom set without side tables? Our wonderful family friends gave us a bed for our guest room and happened to have a set of side tables they wanted to get rid of too. They turned out to be a perfect addition to our set!
The original wood was significantly scratched and required a lot of sanding, but I had enough materials left over from the other projects to finish the job (only purchased one can of spray paint for the base coat)! This was our most cost-effective find by far. These adorable tables tie our bedroom together beautifully.


Coffee Table
Final DIY Cost (Furniture + Materials): $25
Savings: $82.99
This is the one thing I truly considered buying outright. Coffee tables are hard to find second-hand–especially in good condition. I looked and looked with trip after trip to Goodwill and finally, I found it. This adorable piece was $25. This is a little high compared to my other pieces, especially considering its condition. It had many scratches and scrapes. But knowing how much any comparable item would be, I happily took it home with me.
I used a multi-phased approach to get this piece right. First, I used a stain I already had and did multiple coats on the top surface. This helped seal the scrapes after sanding as well as give the darker wood look I was wanting. Then I painted the bottom white. Luckily, I had enough pain previously to finish this job too.
The table turned out just as I imagined and tied all the colors in our living room together perfectly. Not to mention, it’s a great place to set your cookies and popcorn during movie night.


Rustic Shutters
Final DIY Cost (Shutters + Materials): $1
Savings: $154.00
Everyone likes a good treasure hunt. A treasure hunt is exactly where I found myself when I visited my grandparents this past summer. My grandma took me to a locked shed in their backyard. I immediately spotted these cobweb-covered shutters and knew they would be a perfect addition to our home!
I took them home, cleaned them off (very tedious), and white-washed with 3 parts paint, 1 part water. I had my father-in-law help me bracket two sets together, screw the “S” onto the front (a purchase from Hobby Lobby last year that I custom-stained), and secure the garland (Hobby Lobby) to the top. It was a perfect addition to our bedroom!
 Wire Picture Holders
Final DIY Cost (Frames + Materials): $5
Savings: $110.00
This project is a perfect yard sale example! I found this bundle of two wood-framed wire holders at a yard sale for $1. I have no idea what their original purpose was. But I stained the wood, cleaned them up, and used them as picture holders or to put garland on for our bedroom! Blank-canvas décor items are always a plus.


Antique Hutch
Final DIY Cost (Hutch + Materials): $10
Savings: $543.00
Although I didn’t “do” much to this piece, this find is a great example of a simple refurbish. I found this beautiful antique hutch at Goodwill for $10 and bought it before they could even bring it inside. I was in love.
I still haven’t decided if and what color to paint it (and honestly I didn’t have time for another project during the move), so I simply used a scratch cover polish I borrowed from my mom and it shined and smoothed out the nicks and discoloration beautifully! The hutch now sits in our living room until I can decide what color to paint it.
 Black Vintage Lamp
Final DIY Cost (Lamp + Materials): $6
Savings: $113.00
Another crazy find…Mason and I discovered this beautiful lamp (broken) at a yard sale. They had only marked it as $1. Mason proceeded to fix it at the sale so we took it home! It was originally silver matte, which was fine. But I wanted it farmhouse black to match our room.
This was a simple spray paint job, but it’s often hard to get all the crevices, especially on round objects. After taking extra precautions, the lamp turned out perfectly!
Why DIY Is Worth It
Hopefully these few tips, tricks, and inspiration items will help you in your next DIY endeavors. There are so many more projects I would still like to undertake. There are still many more ideas I have. But in the meantime, I hope you will see that DIYing is worth it – financially and design-wise.
After adding it all up, Mason and I saved $1,842.95 on furniture and decor items we would have had to buy for our new house regardless. And this article just featured 8 items!
Thanks for reading and I hope you will join along and share your DIY endeavors.

One thought on “DIY: Do Inspire Yourself”